
I found this really cute DIY for a side chignon/bun a couple of days ago via A cup of Jo, and why not share with you all? I’d love to try it soon.
You may laugh at me, but I don’t have a proper curler, the one I have now it’s older than me, so I don’t use it that much, but I saw a want one that caught my attention. It’s either that or a rotating brush.What do you use?
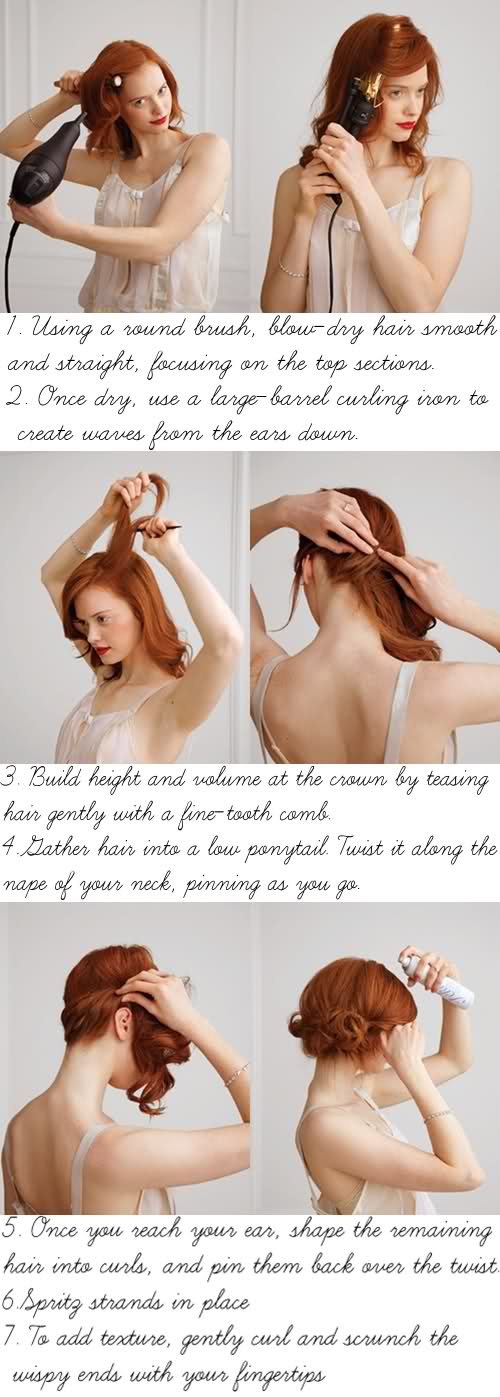
The steps to obtain a gorgeous side chignon:
1.Using a round brush, blow-dry hair smooth and straight, focusing on the top sections.
2.Once dry, use a large-barrel curling iron to create waves from the ears down.
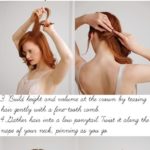
3.Build height and volume at the crown by teasing hair gently with a fine-tooth comb.
4.Gather hair into a low ponytail. Twist it along the nape of your neck, pinning as you go.
5. Once you reach your ear, shape the remaining hair into curls, and pin them back over the twist.
6.Spritz strands in place.
7. To add texture, gently curl and scrunch the wispy ends with your fingertips.
And here’s the result

pare atat de simplu!!!cu putina practica sper sa-mi iese si mie,intr-un final..multumesc tare mult pentru k ai impartasit cu noi pasii:X:X:X:X
pupici dulci si o saptamana cat mai relaxanta..
Wonderful!!! Sunt atat de inspirationale tutorialele pe care le gasesti, si de data asta cu o roscata 😀
xx
Fashezine
Yes, I saw the original post (Jo's blog also inspired me for a post, http://classiq.ro/manhattan-pe-bicicleta)last week and loved the hair style! I saved all the steps and can't wait to try it!
awesome tutorial ! 🙂
I've seen this! I love it, so cute 🙂
Nici eu n-am ondulator…suntem asa triste zau :))) Cand imi iau, incerc si eu 😀
Super! Voi incerca, imediat ce imi cumpar un ondulator, imi tot zic asta de o luna :))
It looks so chic! I think I'll give it a go. I could do with a large-barrel curler though, mine is very thin.
They make it seem so easy!! I would love to try, but I can guarantee my hair will look NOTHING like that! 🙂
oooo eu am incercat deja freza asta vineri seara la teatru.din pacate nu am avut aparatul la mine.Am vazut tutorialul pe http://joannagoddard.blogspot.com/
Iese atata de bine si e foarte foarte simplu.
E magic !Imposibil sa nu iesi in evidenta…orice ai purta 🙂
Nice post darling!
Kisses!
Gorgeous! I love it…
Ƹ̵̡Ӝ̵̨̄Ʒ
I've a feeling my hairs too long to try this but it looks absolutely gorgeous!
Foarte frumos! Imi place mult culoarea parului! :O